How to Install QL Player on Android Navori QL Stix 3500 (saas and self hosted)
IMPORTANT INFORMATION:
- The easiest way to navigate around on the Stix is to connect a keyboard and mouse via USB.
- Stix purchased from September 2018 and above now has the Android conductor pre-installed.
- All Stix serial numbers starting with 201808 (2018 August) and below are ROOTED Stix & MUST use the GENERIC apk located on your Manager Interface under download QL Player for Android.
- Stix 3700 to be released 2021
Perform the steps below prior to launching the pre-installed Conductor installed
Configuration:
1. Plug in the device and connect an HDMI cable to the display/TV.
2. Connect a USB mouse and keyboard to the device’s USB ports. You will need these to configure the date and time and Activate Navori.
3. The device is compatible with wired and wireless networks. If using WiFi, you will need to configure the connection via the Android Settings (you will need the network SSID name and password for this step), otherwise, connect your network cable to the RJ45 port at the one end of the device and it will automatically detect any available internet connection.
4. Set the device’s time zone via the Android settings (select Settings > Date and Time)
5. Right-click your mouse to go back or escape to exit the Android settings.
Installation:
1. Stix serial numbers starting with 201808 (2018 August) have the conductor.apk preloaded, navigate to the Android Apps Menu ( 6 dots) and launch the Conductor.
2. If your player does not have the conductor preloaded, you will need to manually download the conductor apk from QL Manager, the apk can be downloaded directly from the android browser.
3. log in to your manager, if you are on SAAS enter this URL (gear icon) > Player Management > Download QL Player > Generic (for Stix device prior to September 2018) or Navori Stix3500 (for Stix device after September 2018) .
4. Once downloaded, navigate to Explorer > Downloads folder and launch the Conductor > Click Install to install the app, and then click open, to open it and perform the player activation.
Activation
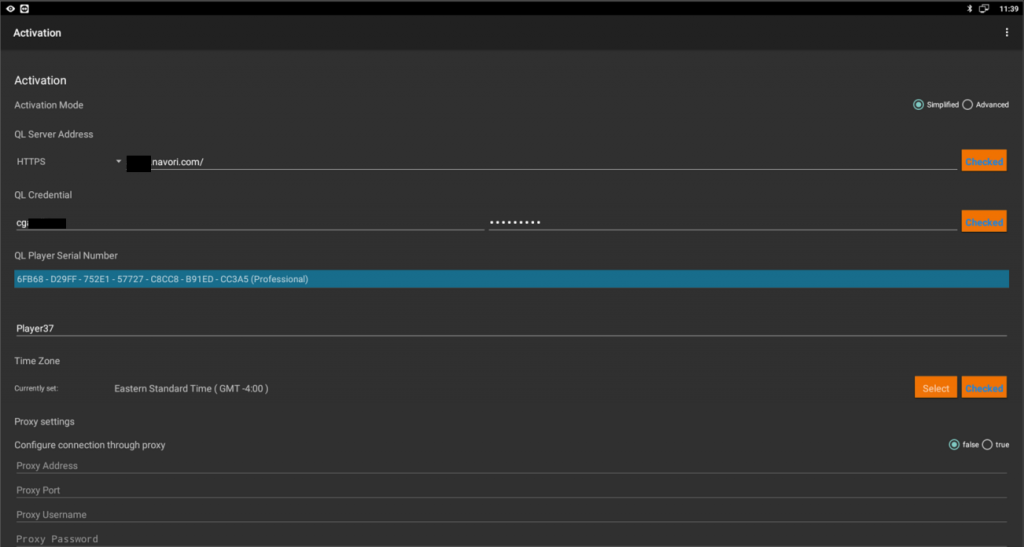
a. Simplified Option:
1. Enter your Server URL (IP/DNS). If you are on the SaaS select HTTPS from the drop-down and enter saas.navori.com and click Checked
2. Enter your Navori credentials, click Checked and select the player serial number that appears.
3. You may also update the Players name.
b. Advanced Option:
1. Enter your Server URL (IP/DNS). If you are on the SaaS select HTTPS from the drop-down and enter saas.navori.com and click Checked
2. Manually enter an available Player License from QL Manager (License should be grey) and click Checked
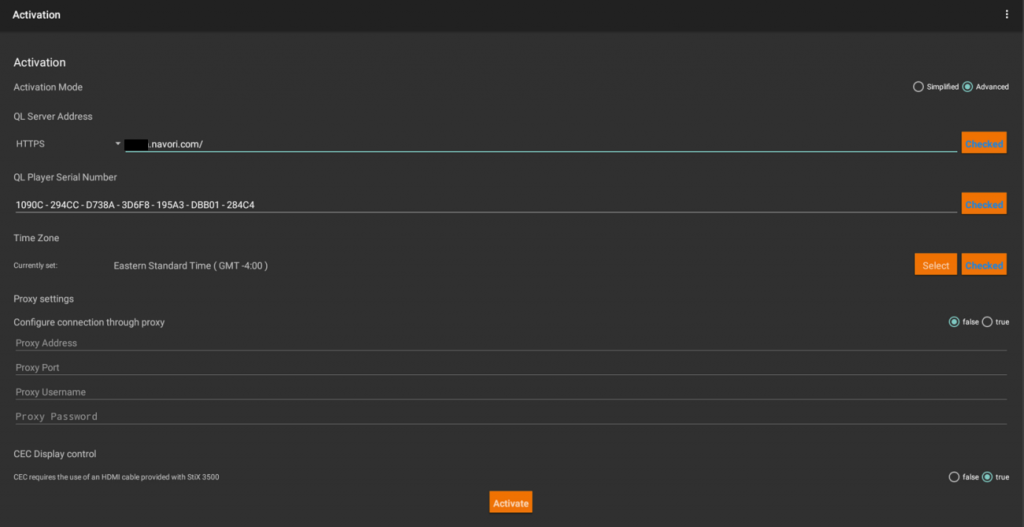
3) Make sure the time zone is correct and click the checked button.
4) Proxy settings are set to false by default, if proxy is required, set the option to Tue to enable the feature and enter proxy details.
5) CEC Display control is set to True by default.
Note- Please note that this feature will work only if your screen is CEC compatible, and if you use the provided HDMI cable.
If your screen is not HDMI-CEC compatible, set this value to False
6) Once all the fields are checked, hit the ACTIVATE button.
You will see a message saying ACTIVATION SUCCESSFUL and the device will automatically reboot.
7) After the reboot, Navori QL Player will launch and show the default media on the screen. This means you have successfully completed the QL Player installation and the player should appear online (Green) in QL Manager.
For information on how to send an update to your player.
please see Help File: FAQ-5103